如果您没有设置本地 Web 服务器,我建议您下载并安装XAMPP。XAMPP 是一个跨平台的 Web 服务器包,其中包括后端开发人员的必需品。它包括 PHP、MySQL、Apache、phpMyAdmin 等。无需使用 XAMPP 单独安装所有软件。
我们现在可以启动我们的 Web 服务器并创建我们将用于登录系统的文件和目录。
* {box-sizing: border-box;font-family: -apple-system, BlinkMacSystemFont, "segoe ui", roboto, oxygen, ubuntu, cantarell, "fira sans", "droid sans", "helvetica neue", Arial, sans-serif;font-size: 16px;-webkit-font-smoothing: antialiased;-moz-osx-font-smoothing: grayscale;}body {background-color: #435165;}.login {width: 400px;background-color: #ffffff;box-shadow: 0 0 9px 0 rgba(0, 0, 0, 0.3);margin: 100px auto;}.login h1 {text-align: center;color: #5b6574;font-size: 24px;padding: 20px 0 20px 0;border-bottom: 1px solid #dee0e4;}.login form {display: flex;flex-wrap: wrap;justify-content: center;padding-top: 20px;}.login form label {display: flex;justify-content: center;align-items: center;width: 50px;height: 50px;background-color: #3274d6;color: #ffffff;}.login form input[type="password"], .login form input[type="text"] {width: 310px;height: 50px;border: 1px solid #dee0e4;margin-bottom: 20px;padding: 0 15px;}.login form input[type="submit"] {width: 100%;padding: 15px;margin-top: 20px;background-color: #3274d6;border: 0;cursor: pointer;font-weight: bold;color: #ffffff;transition: background-color 0.2s;}.login form input[type="submit"]:hover {background-color: #2868c7;transition: background-color 0.2s;}
在HTML的头部head添加下列代码添加css样式
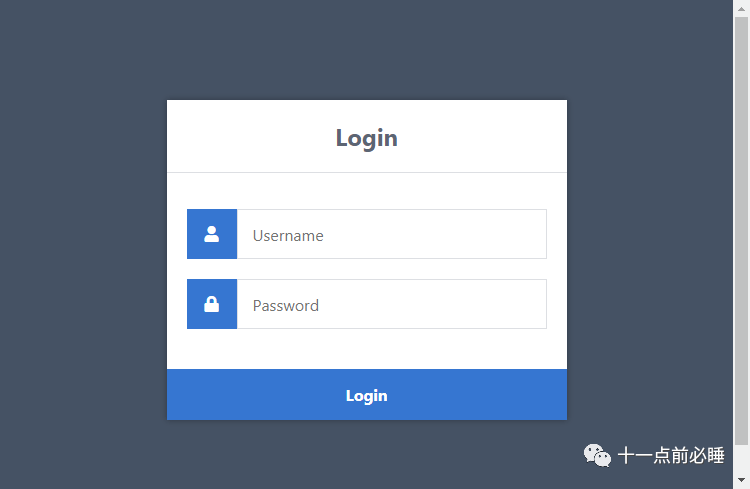
<link href="style.css" rel="stylesheet" type="text/css">效果如下图

表单——我们需要同时使用行动和邮政属性。这行动属性将设置为身份验证文件。提交表单时,会将表单数据发送到认证文件进行处理。除此之外方法被声明为邮政因为这将使我们能够使用 POST 请求方法处理表单数据。
输入(文本/密码) ——我们需要为表单字段命名,以便服务器能够识别它们。属性值姓名我们可以声明为用户名,我们可以使用它来检索身份验证文件中的 post 变量以获取数据,例如:$_POST[‘用户名’].

输入(提交) ——表单提交时,数据将被发送到我们的身份验证文件进行处理。
对于这一部分,您将需要使用phpMyAdmin或您首选的 MySQL 数据库管理应用程序访问您的 MySQL 数据库。
如果您使用的是phpMyAdmin ,请按照以下说明操作。
您可以使用自己的数据库名称,但在本教程中,我们将使用phplogin。
我们现在需要的是一个帐户表,因为它将存储在系统中注册的所有帐户(用户名、密码、电子邮件等)。
单击左侧面板上的数据库(phplogin)并执行以下 SQL 语句:
CREATE TABLE IF NOT EXISTS `accounts` (`id` int(11) NOT NULL AUTO_INCREMENT,`username` varchar(50) NOT NULL,`password` varchar(255) NOT NULL,`email` varchar(100) NOT NULL,PRIMARY KEY (`id`)) ;INSERT INTO `accounts` (`id`, `username`, `password`, `email`) VALUES (1, 'test', 'test', 'test@test.com');上面的 SQL 语句代码将创建包含列的帐户表ID,用户名,密码, 和电子邮件.SQL 语句将使用用户名插入一个测试帐户:测试, 和密码:测试. 测试帐户将用于测试目的,以确保我们的登录系统正常运行。

从身份验证文件开始,它将处理和验证我们将从index.html文件发送的表单数据。
编辑authenticate.php文件并添加以下内容:
session_start();// Change this to your connection info.$DATABASE_HOST = 'localhost';$DATABASE_USER = 'root';$DATABASE_PASS = '';$DATABASE_NAME = 'phplogin';// Try and connect using the info above.$con = mysqli_connect($DATABASE_HOST, $DATABASE_USER, $DATABASE_PASS, $DATABASE_NAME);if ( mysqli_connect_errno() ) {// If there is an error with the connection, stop the script and display the error.exit('Failed to connect to MySQL: ' . mysqli_connect_error());}
最初,代码将启动会话,因为这使我们能够在服务器上保留帐户详细信息,稍后将用于记住登录用户。
连接到数据库是必不可少的。没有它,我们如何检索和存储与用户相关的信息?因此,我们必须确保更新变量以反映我们的 MySQL 数据库凭据。
在下面添加:
// Now we check if the data from the login form was submitted, isset() will check if the data exists.if ( !isset($_POST['username'], $_POST['password']) ) {// Could not get the data that should have been sent.exit('Please fill both the username and password fields!');}
上面的代码将确保表单数据存在,而如果用户尝试访问文件而不提交表单,它将输出一个简单的错误。
在下面添加:
// Prepare our SQL, preparing the SQL statement will prevent SQL injection.if ($stmt = $con->prepare('SELECT id, password FROM accounts WHERE username = ?')) {// Bind parameters (s = string, i = int, b = blob, etc), in our case the username is a string so we use "s"$stmt->bind_param('s', $_POST['username']);$stmt->execute();// Store the result so we can check if the account exists in the database.$stmt->store_result();$stmt->close();}
上面的代码将准备 SQL 语句,它将选择ID和密码帐户表中的列。此外,它将绑定用户名到 SQL 语句,执行,然后存储结果。
在以下行之后:
$stmt->store_result();if ($stmt->num_rows > 0) {$stmt->bind_result($id, $password);$stmt->fetch();// Account exists, now we verify the password.// Note: remember to use password_hash in your registration file to store the hashed passwords.if (password_verify($_POST['password'], $password)) {// Verification success! User has logged-in!// Create sessions, so we know the user is logged in, they basically act like cookies but remember the data on the server.session_regenerate_id();$_SESSION['loggedin'] = TRUE;$_SESSION['name'] = $_POST['username'];$_SESSION['id'] = $id;echo 'Welcome ' . $_SESSION['name'] . '!';} else {// Incorrect passwordecho 'Incorrect username and/or password!';}} else {// Incorrect usernameecho 'Incorrect username and/or password!';}
主页将是我们的用户登录后看到的第一个页面。他们可以访问此页面的唯一方法是他们是否已登录,而如果他们没有登录,他们将被重定向回登录页面。
编辑home.php文件并添加以下代码:
// We need to use sessions, so you should always start sessions using the below code.session_start();// If the user is not logged in redirect to the login page...if (!isset($_SESSION['loggedin'])) {header('Location: index.html');exit;}<html><head><meta charset="utf-8"><title>Home Page</title><link href="style.css" rel="stylesheet" type="text/css"><link rel="stylesheet" href="https://use.fontawesome.com/releases/v5.7.1/css/all.css"></head><body class="loggedin"><nav class="navtop"><div><h1>Website Title</h1><a href="profile.php"><i class="fas fa-user-circle"></i>Profile</a><a href="logout.php"><i class="fas fa-sign-out-alt"></i>Logout</a></div></nav><div class="content"><h2>Home Page</h2><p>Welcome back, =$_SESSION['name']!</p></div></body></html>.navtop {background-color: #2f3947;height: 60px;width: 100%;border: 0;}.navtop div {display: flex;margin: 0 auto;width: 1000px;height: 100%;}.navtop div h1, .navtop div a {display: inline-flex;align-items: center;}.navtop div h1 {flex: 1;font-size: 24px;padding: 0;margin: 0;color: #eaebed;font-weight: normal;}.navtop div a {padding: 0 20px;text-decoration: none;color: #c1c4c8;font-weight: bold;}.navtop div a i {padding: 2px 8px 0 0;}.navtop div a:hover {color: #eaebed;}body.loggedin {background-color: #f3f4f7;}.content {width: 1000px;margin: 0 auto;}.content h2 {margin: 0;padding: 25px 0;font-size: 22px;border-bottom: 1px solid #e0e0e3;color: #4a536e;}.content > p, .content > div {box-shadow: 0 0 5px 0 rgba(0, 0, 0, 0.1);margin: 25px 0;padding: 25px;background-color: #fff;}.content > p table td, .content > div table td {padding: 5px;}.content > p table td:first-child, .content > div table td:first-child {font-weight: bold;color: #4a536e;padding-right: 15px;}.content > div p {padding: 5px;margin: 0 0 10px 0;}现在我们已经设置了主页,我们可以将用户从authenticate.php文件重定向到我们的主页,编辑authenticate.php并替换以下代码行:
echo 'Welcome ' . $_SESSION['name'] . '!';
和:
header('Location: home.php');编辑profile.php文件并添加以下代码:
// We need to use sessions, so you should always start sessions using the below code.session_start();// If the user is not logged in redirect to the login page...if (!isset($_SESSION['loggedin'])) {header('Location: index.html');exit;}$DATABASE_HOST = 'localhost';$DATABASE_USER = 'root';$DATABASE_PASS = '';$DATABASE_NAME = 'phplogin';$con = mysqli_connect($DATABASE_HOST, $DATABASE_USER, $DATABASE_PASS, $DATABASE_NAME);if (mysqli_connect_errno()) {exit('Failed to connect to MySQL: ' . mysqli_connect_error());}// We don't have the password or email info stored in sessions so instead we can get the results from the database.$stmt = $con->prepare('SELECT password, email FROM accounts WHERE id = ?');// In this case we can use the account ID to get the account info.$stmt->bind_param('i', $_SESSION['id']);$stmt->execute();$stmt->bind_result($password, $email);$stmt->fetch();$stmt->close();上面的代码从数据库中检索额外的账户信息,和之前的主页一样,我们不需要连接到数据库如何登录mysql,因为我们检索了存储在会话中的数据。
我们将填充用户的所有帐户信息,因此我们必须检索密码和电子邮件数据库中的列。我们不需要检索用户名或者ID列如何登录mysql,因为我们将它们存储在在authenticate.php文件中声明的会话变量中。
在结束标记之后,添加以下代码:
<html><head><meta charset="utf-8"><title>Profile Page</title><link href="style.css" rel="stylesheet" type="text/css"><link rel="stylesheet" href="https://use.fontawesome.com/releases/v5.7.1/css/all.css"></head><body class="loggedin"><nav class="navtop"><div><h1>Website Title</h1><a href="profile.php"><i class="fas fa-user-circle"></i>Profile</a><a href="logout.php"><i class="fas fa-sign-out-alt"></i>Logout</a></div></nav><div class="content"><h2>Profile Page</h2><div><p>Your account details are below:</p><table><tr><td>Username:</td><td>=$_SESSION['name']</td></tr><tr><td>Password:</td><td>=$password</td></tr><tr><td>Email:</td><td>=$email</td></tr></table></div></div></body></html>编辑logout.php文件并添加以下代码:


